Agenda
This page explains how to configure and publish an agenda after finalizing the selection process.
The agenda is composed of tracks and time slots, and each slot can be assigned to a session or a break. The agenda can be published before or after the event has taken place. After the event, the attendees can watch the recordings and download the slides from the agenda page.
Create a new agenda
To create a new agenda:
- Log into the system
- In the sidebar menu, select Events and click on the name of your event to open the event management page.
-
In the sidebar menu, select Agenda > Agenda.
-
Click the button Create Agenda
-
Fill the form fields and click Save.
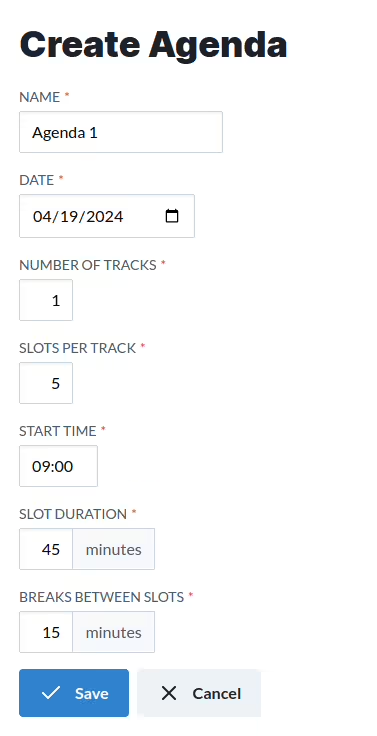
The form includes the following fields:
- Name: The name of the agenda. This name will be displayed in the agenda page. Your event can have different agendas for multiple days.
- Date: The date of the agenda. By default, the date of the event is selected, but you can change it if your event spans multiple days.
- Number of tracks: The number of tracks in the agenda.
- Slots per track: The number of slots in each track.
- Start time: The time when the first slot of the agenda will start, relative to the event timezone.
- Slot Duration: The duration of each slot in the agenda, in minutes.
- Breaks between slots: The duration of the breaks between slots, in minutes.
This form will automatically create the tracks and slots for the agenda. You can add more tracks and slots later.
Agenda grid
Click on an agenda to display the agenda grid. An agenda grid is composed of tracks (like “Track A” or “Cloud Track”) and time intervals (like “09:00-09:45”). The agenda will be displayed as a table on desktop, but as a list on mobile devices. For e-readers, the agenda will be read as a table, which makes it more accessible to navigate (by tracks or time slots) for blind users. To see a live example, you can visit the demo.
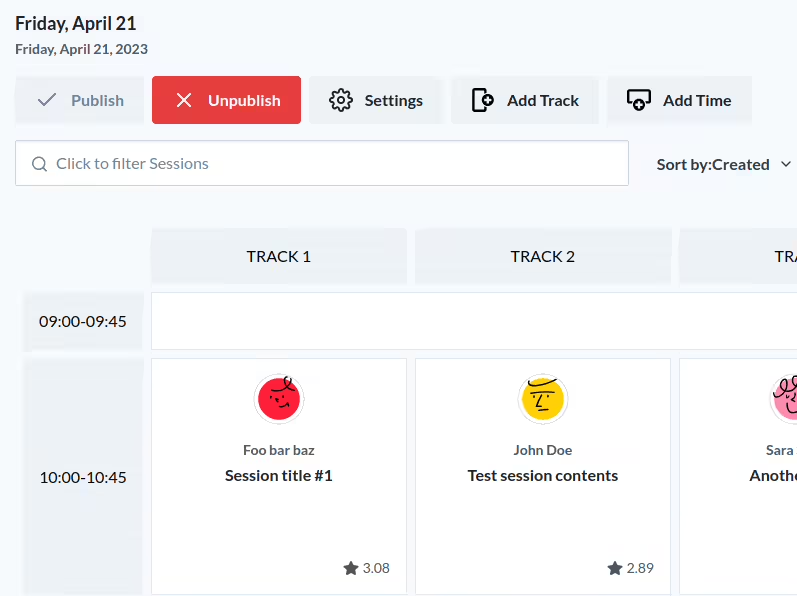
While editing the agenda grid on desktop, you can drag sessions from the list on the left of the screen to any available slot, or drag betweem slots to switch them. On mobile, you do each change manually by clicking on each slot and editing on the form.
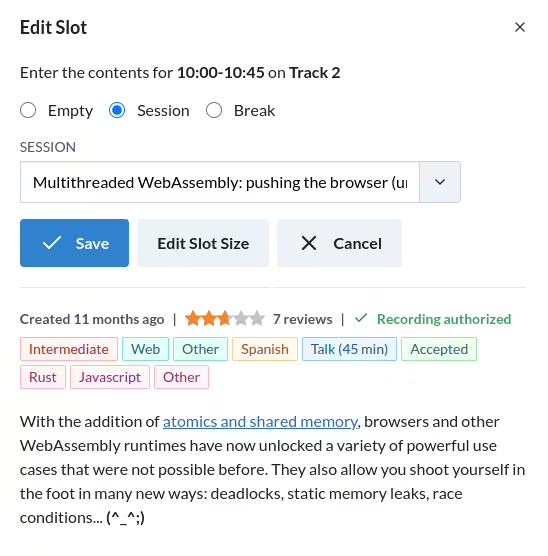
A slot can have one of three types:
- Empty: This is the default, it means that the slot is available.
- Session: A slot that has been assigned to a session.
- Break: A slot that has been assigned to a break, e.g. coffee, lunch break, inscription, etc.
To assign a session to a slot, set the Slot type to “Session” and enter the session name. Alternatively, you can drag sessions from the list on the left into any slot. If there is already a session on that slot, it will be unassigned from the agenda. If you drag and drop two slots, they will exchange places in the agenda.
Row and column span
A slot can span multiple rows and columns to take more than one track or time slot. In order to change the number of columns or rows, click on the slot to open the edition dialog and click Edit Slot Size.
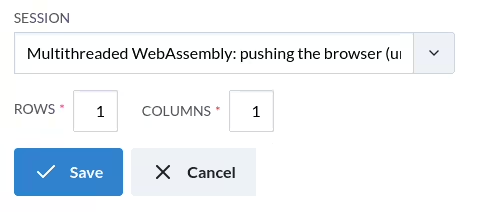
You can now enter the new value for row and column span. For example, if you want to make a session take two tracks, you can set the number of columns to 2. If you want to make a session take two time slots, you can set the number of rows to 2.
Keep in mind that the maximum value is limited by the number of empty slots available to the right and below the slot. If you are trying to use both row and column span at the same time, the affected area needs to be empty.
Publish the agenda
At the top of the grid page there are buttons to Publish and Unpublish the agenda. Your changes to the agenda grid (agenda structure, new and removed session slots) are in draft until you click the Publish button.
Presenters can modify their session anytime (title and description, bio or picture). Any changes to a published session will be immediately visible in the published agenda.
To modify a presentation, visit the call for papers or open the user profile of the presenter and select Sessions on the sidebar menu.
The input fields for slides and video are only displayed for sessions that have been accepted and have an assigned slot in the agenda. If you cannot see them, double-check the status of your session.
Once published, other users can bookmark their favorite sessions. If feedback is enabled in the agenda settings (look for Agenda > Settings on the sidebar menu), they can also leave reviews and comment on each session.
Any changes to an agenda will require republishing the agenda to be visible to the attendees. The agenda will reload detected changes within a few minutes, provided that it is scheduled for the same day. For agendas that are not scheduled for the current day, the reload behavior is disabled.
Session Recordings
If you have enabled the session recording feature, you can upload the video and slides for each session. To do this, click on the session in the agenda grid to open the edit dialog, and fill in the Video URL and Slides URL fields.
After the event has taken place, the attendees can watch the recordings from the agenda page, and download the slides.
Koliseo supports automatic recording highlights, which are bookmarks of the most relevant moments of the session. These highlights are generated automatically by the system and can be used to quickly navigate through the session recording. Recording highlights are available by invite only, so please contact us if you are interested in using it for your event.
Embed the agenda
You can embed the agenda on your own website by using an iframe. To see an example, visit the web integration demo. Be aware of the following limitations:
- The headers of columns and rows will not be sticky.
- Any features requiring login will not be available, such as bookmarking sessions or leaving feedback.
Deep linking to specific sessions and filtering by session contents are both supported. Keep in mind that both features may change the URL in the containing website, by adding the GET parameters required by these features.
In order to embed the agenda, you must configure your website domain as an Authorized Domain in the event settings.